
In the spirit of zero-trust, you may want to protect certain, critical servers such as jump boxes inside your organization. If you already have a MikroTik router and an SSO solution with RADIUS capabilities in place, here is what you could do to implement password-based access.
Access restriction
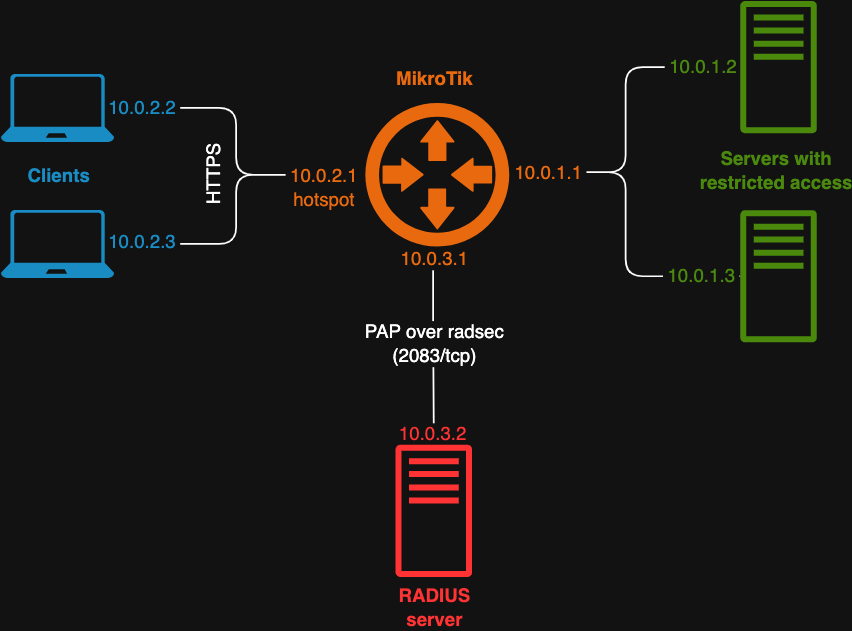
Access to your selected group of servers is restricted at the IP level (Layer 3). For this solution to work, clients and servers must be in separate subnets (otherwise there is no routing between them), which is hopefully true in your network already.
Restricted access is implemented by the IP Walled Garden functionality of the HotSpot server in MikroTik.
Authentication
Users may access the restricted servers by providing their credentials. The authentication frontend is implemented by the HotSpot Gateway (aka. captive portal) functionality in MikroTik.
Users enter their user name and password credentials on the login screen of the HotSpot Gateway server, which are then transmitted over HTTPS. It requires a properly signed TLS certificate that browsers will accept (the easiest way is perhaps to go with Let’s Encrypt). You may optionally assign a local DNS name to the IP address of the HotSpot Gateway and have the certificate issued for that DNS name.
The HotSpot Gateway is also used to lease out IP address to client hosts. The HotSpot Gateway server will revoke access from clients with no network traffic coming from them (disconnected from the network) after a given timeout (keepalive-timeout).
Identity management and the authentication backend is provided via a RADIUS server in your organization. Many authentication servers support the RADIUS protocol. The configuration presented below was tested using a Keycloak server, where RADIUS was embedded as a plugin.
The HotSpot server in MikroTik sends the credentials to the RADIUS server via the PAP method, which is a clear-text protocol on its own. The communication between the HotSpot server and the RADIUS server, however, happens over the RADSEC protocol (using TCP port 2083), which provides encryption via TLS.
MikroTik configuration
The example below is a rudimentary MikroTik configuration to set up a HotSpot Gateway server, with RADIUS as the authentication method, and IP Walled Garden for access restriction.
Please don’t forget to take a backup of your existing MikroTik configuration before making any changes.
Enabling HotSpot functionality
The HotSpot server comes in its own package, which needs to be enabled, and then the router must be restarted.
/system package enable hotspot

/system reboot
Configuring RADIUS server for HotSpot Gateway
/radius
add \
address=10.0.3.2 \
protocol=radsec \
secret=radsec \
service=hotspot \
timeout=3s
We tell the HotSpot server that it can reach the RADIUS server at IP address 10.0.3.2, over the RADSEC protocol.
/radius incoming
set accept=yes
We enable the RADIUS server to send a request to our router to drop clients.
Setting up SSL the for HTTPS login screen
For HTTPS, the SSL service must be enabled.
/ip service set www-ssl disabled=no
A certificate and a key needs to be generated (not shown here), and added into the MikroTik router.
We need to copy the file into the router. In this example we use SCP, but you can also use WinBox.
scp hotspot.crt admin@10.0.1.1:hotspot.p12
We need to import the certificate and key from the file copied into the router.
/certificate import file-name=hotspot.p12
Configuring IP addresses
First we create a pool of IP addresses (my-restricted-subnet-hs-pool) that will be used by the HotSpot Gateway server for assigning IPs to clients.
/ip pool
add \
name=my-restricted-subnet-hs-pool \
ranges=10.0.2.2-10.0.2.253
Our hotspot network is 10.0.2.0/24.
We also define a separate IP address for the hotspot server itself.
/ip address
add \
address=10.0.2.1/24 \
interface=ether4 \
network=10.0.2.0 \
comment="Hotspot network for restricted server access"
We define the IP address 10.0.2.1 for the ether4 port.
Configuring HotSpot Gateway profile: network, login page, and RADIUS
Now we can configure the hotspot server itself.
First we create a hotspot server profile (my-restricted-subnet-hs-prof).
/ip hotspot profile
add \
name=my-restricted-subnet-hs-prof \
hotspot-address=10.0.2.1 \
html-directory=/flash/hotspot \
login-by=https \
use-radius=yes \
nas-port-type=ethernet \
radius-accounting=no \
ssl-certificate=hotspot.crt
Here we set up the login screen as the built-in HTML page under the /flash/hotspot directory, we specify that the login screen is accessed over HTTPS, and provide the SSL certificate for HTTPS. We set up RADIUS for authentication, without accounting.
(The Network Access Server (NAS) in RADIUS parlance is the client connecting to the RADIUS server. In our case, it is the MikroTik router. The nas-port-type is an optional value that the hotspot server sends to indicate what type of physical port is used on the router to connect to RADIUS.)
Configuring HotSpot Gateway server: profile, interface, address pool, and timeout
Now we can create the HotSpot server itself.
/ip hotspot
add \
name=my-restricted-subnet-hs \
profile=my-restricted-subnet-hs-prof \
interface=ether4 \
address-pool=my-restricted-subnet-hs-pool \
keepalive-timeout=5m
Here we set up a HotSpot server with the profile and the address pool created earlier. We set up the HotSpot server to be available on interface ether4. We set up a timeout of 5 minutes to allow clients to stay out of reach for a while, before they get removed by the HotSpot.
Setting up IP Walled Garden in HotSpot Gateway
We define a list of servers for restricted access.
/ip firewall address-list
add address=10.0.1.2 list=my-restricted-servers
add address=10.0.1.3 list=my-restricted-servers
Then we create a deny list via the IP Walled Garden functionality of the HotSpot Gateway.
/ip hotspot walled-garden ip
add \
server=my-restricted-subnet-hs \
action=accept \
dst-address-list=!my-restricted-servers
The IP Walled Garden is meant to provide access to some IP addresses without authorization. We, however, set it up the other way round: to allow access to every address that is not in my-restricted-servers list (note the exclamation mark).
Possible enhancements
If you want to provide access from multiple networks, such as your wired and wireless networks, or through your VPN network, you can set up multiple HotSpot Gateway servers for the given interfaces. If you also want to use a DNS name, you may add a common IP address for that name, and set up destination NAT rules to forward traffic to the appropriate HotSpot servers based on source addresses.
To further enhance security, you may also configure your authentication server to use one-time passwords (OTPs) instead of regular, fixed passwords.